Single Sign-On (SSO) allows your users to log in securely to Techdinamics applications using their existing company credentials, simplifying the user experience and centralizing access control.
This guide explains how to configure a SAML 2.0 connection between your Microsoft Entra ID (formerly Azure AD) and Techdinamics products.
 | This guide requires administrative access to your organization's Microsoft Entra ID center. Ensure you complete all steps and send the final metadata file to your Techdinamics representative to finalize the integration. | |
| | ||
TABLE OF CONTENTS
- Creating the Enterprise Application
- Configuring Basic SAML SSO
- Configuring Attributes and Claims
- Assigning Users or Groups
- Providing Metadata to Techdinamics
Creating the Enterprise Application
To begin the integration, you must create a dedicated application within your Microsoft environment.
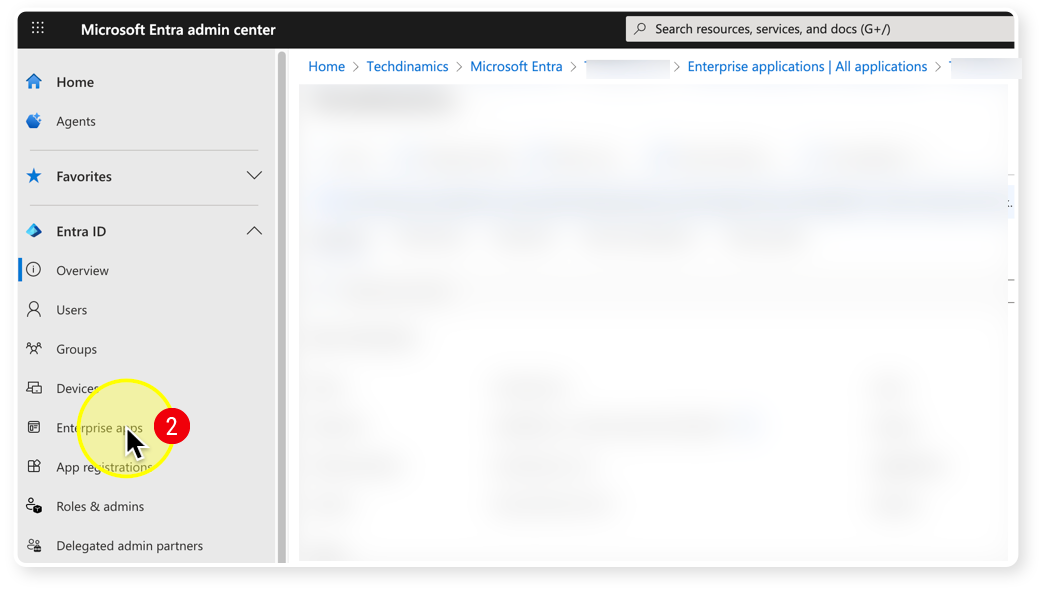
 | Access your Microsoft Entra admin center. |
 | Navigate to Enterprise applications from the left menu under the Entra ID section. |
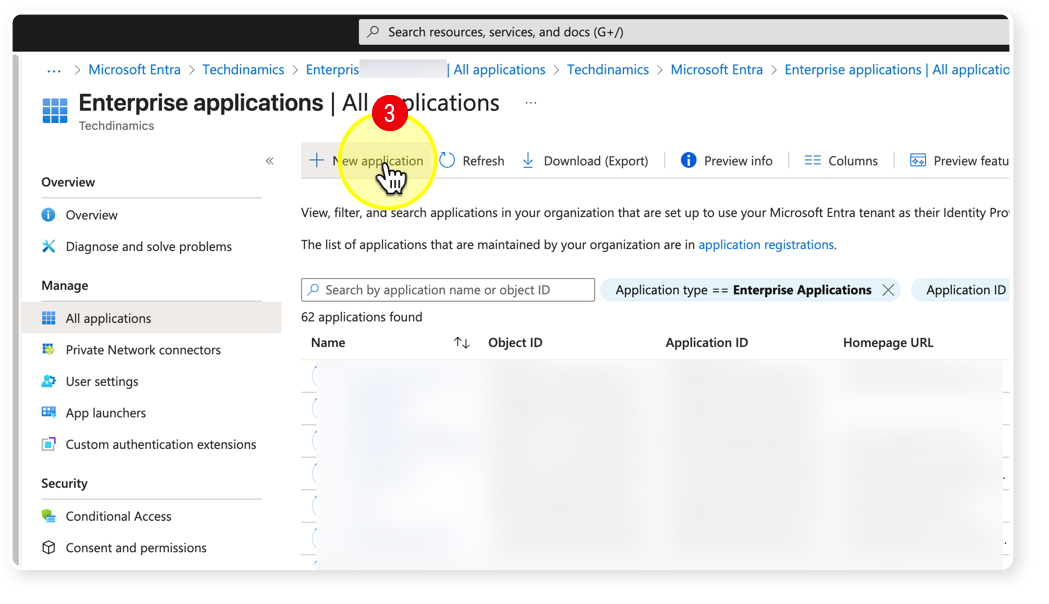
 | Click New application at the top of the screen. |
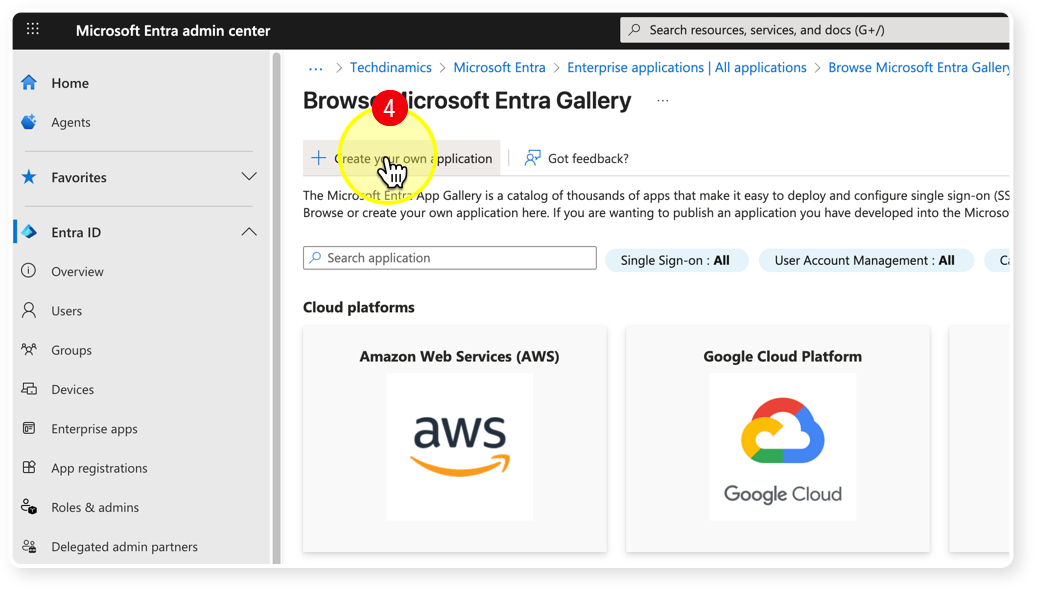
 | Click Create your own application to open the side panel. |
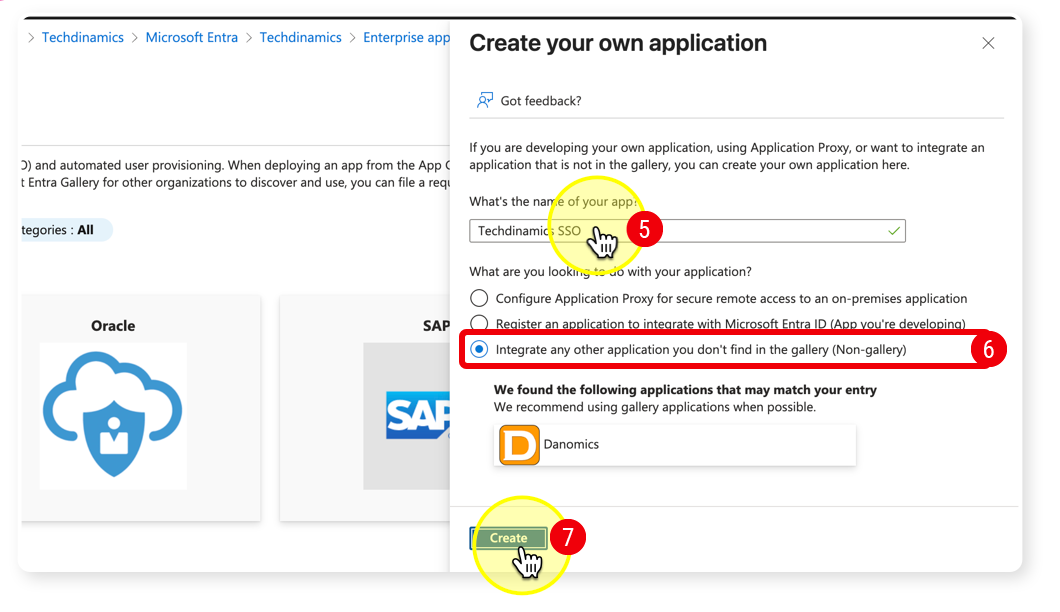
 | Enter a descriptive name, such as Techdinamics SSO, in the provided field. |
 | Select the option to Integrate any other application you don't find in the gallery (Non-gallery). |
 | Click Create to initialize the application. |
Configuring Basic SAML SSO
Once the application is created, you must input the specific routing coordinates for the Techdinamics Amazon Cognito environment.
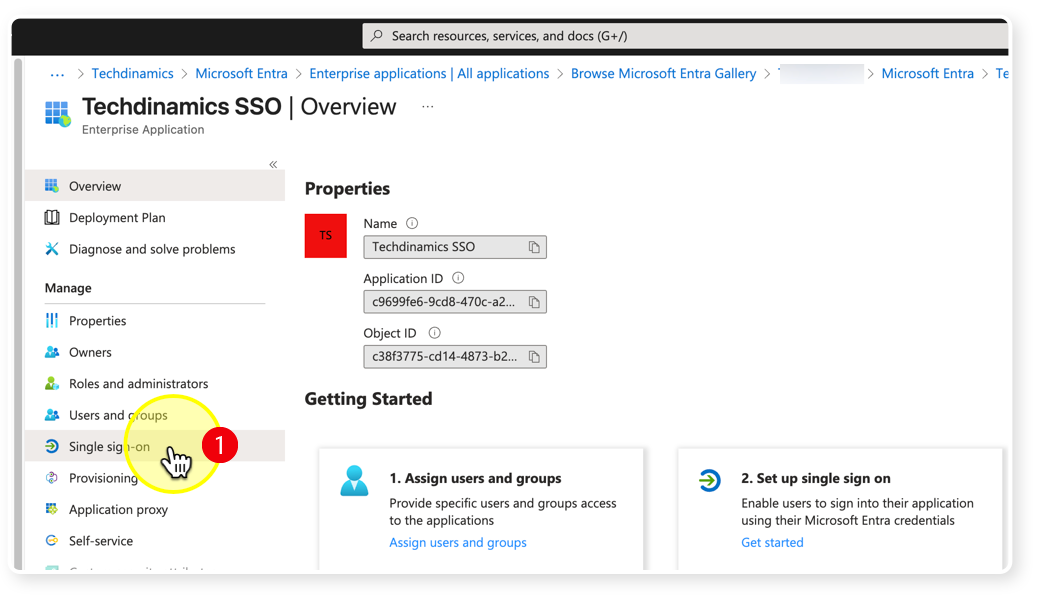
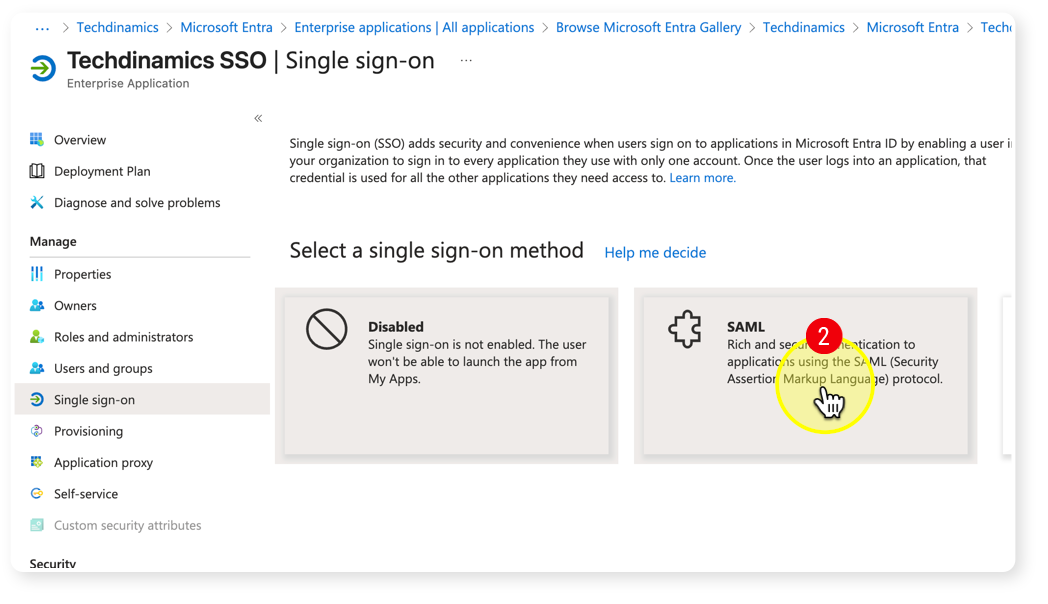
| Select Single sign-on from the left menu under the Manage section of your new application. |
| Select the SAML tile to set it as your sign-on method. |
| Click Edit in the Basic SAML Configuration box. |
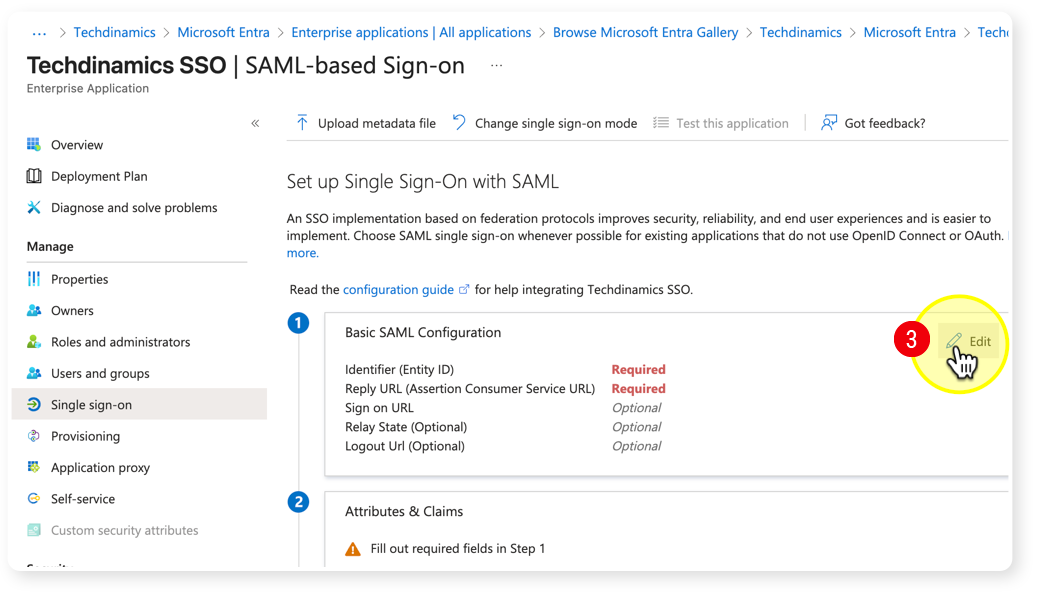
| Add exactly the following Identifier (Entity ID): |
urn:amazon:cognito:sp:us-east-1_nBt9YLKW6
| Add exactly the following Reply URL (Assertion Consumer Service URL): |
https://techdinamics-unified-new.auth.us-east-1.amazoncognito.com/saml2/idpresponse
| Add exactly the following Sign on URL: |
https://techdinamics-unified-new.auth.us-east-1.amazoncognito.com/login?response_type=code&client_id=58aqa5kabg52mmsbejrjgll3ua&redirect_uri=https://auth.techdinamics.io/signin-oidc
| Click Save at the top of the panel and close the configuration window. |
 | The Identifier (Entity ID), Reply URL (ACS URL), and Sign on URL values are specific to the Techdinamics Amazon Cognito environment and must be entered exactly as shown. Incorrect values will prevent SAML authentication from functioning correctly. | |
| | ||
Configuring Attributes and Claims
You must configure the SAML application to send specific user data (claims) so Techdinamics can correctly identify the user logging in.
| Scroll down to the Attributes & Claims box and click Edit. |
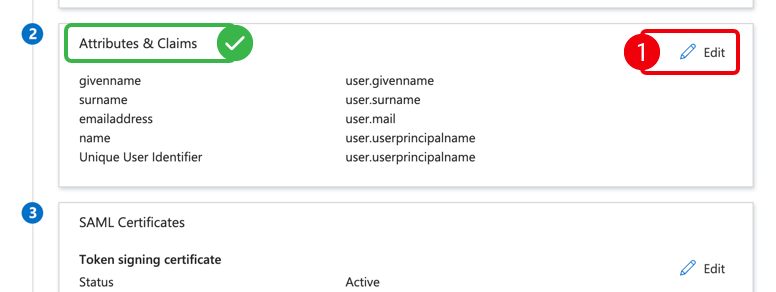
| Ensure the Name ID and Email claims are mapped to a stable, unique email identifier (e.g., user.mail or user.userprincipalname). |
| It is highly recommended to configure the following additional claims for proper profile creation: |
- given_name: Mapped to
user.givenname - family_name: Mapped to
user.surname - name: Mapped to
user.displayname
| Click Save once all required claims are mapped. |
Assigning Users or Groups
Before testing the application, you must authorize specific users in your organization to access it.
| Navigate to Users and groups under the Manage section in the left menu. |
| Click Add user/group and select the appropriate personnel. |
| For initial testing, we recommend assigning at least: |
- One Administrator user.
- One Standard user.
- One user with your normal MFA/Security policy applied.
| Click Assign to save your selections. |
Providing Metadata to Techdinamics
To complete the setup on our side, you must extract your configuration details and send them securely to our team.
| Navigate back to the Single sign-on page. |
| Scroll down to the SAML Certificates section. |
| Locate the Federation Metadata XML row and click Download. |
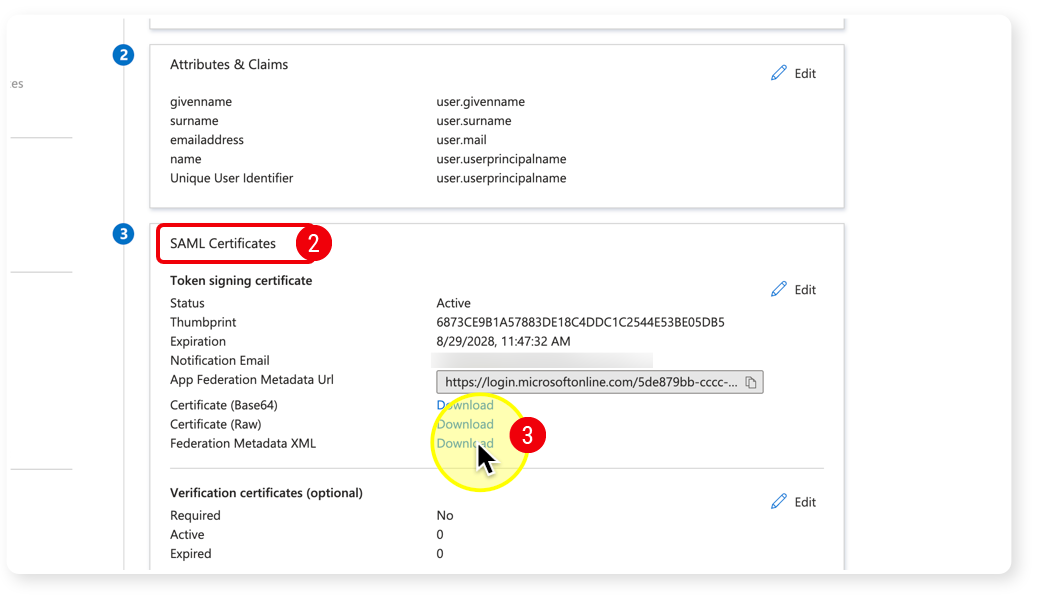
| Email the downloaded XML file to your assigned Techdinamics contact. |
| In your email, you must also include the following critical details: |
- A Test user email (e.g., user@yourcompany.com).
- Your authorized Email domain(s) (e.g., yourcompany.com).
- Any special Claim names if you altered them from the defaults requested above.
- Specific Group/Role claim details only if role-based access is explicitly required for your setup.
Your application is now configured on the Microsoft side. Once Techdinamics processes your metadata, our team will contact you to perform a live test and validate the SSO login flow.
Was this article helpful?
That’s Great!
Thank you for your feedback
Sorry! We couldn't be helpful
Thank you for your feedback
Feedback sent
We appreciate your effort and will try to fix the article