To connect OSA, first create a Fulfillment Channel connection, and then set up the connection parameters.
 WARNING: This article details the steps to connect using the beta version of this fulfillment channel. The stable version can be edited, but new instances can no longer be created, and its options may differ from those listed here.
Once the connection is established between the system and techOMS, you can push Sales Orders, pull inventory levels and shipments, send and get receipts, get stock updates, and synchronize inventory.
This is a two-phase procedure:
- Create the Fulfillment Channel
- Configure additional parameters
 NOTE: Make sure that you are operating at the right Vendor/Warehouse beforehand.
CREATE THE FULFILLMENT CHANNEL
To create a Fulfillment Channel, follow the instructions in How to set up Warehouses and Fulfillment Channels for an Account [Step-by-step guide].
Once added, proceed to the following section.
CONFIGURE ADDITIONAL PARAMETERS
To configure additional parameters:
1. Click Channels from the left menu under the Fulfillment Channels section.
2. Click on the created channel's name in the list.

3. Modify parameters in each section as needed. Press Save to apply your changes.
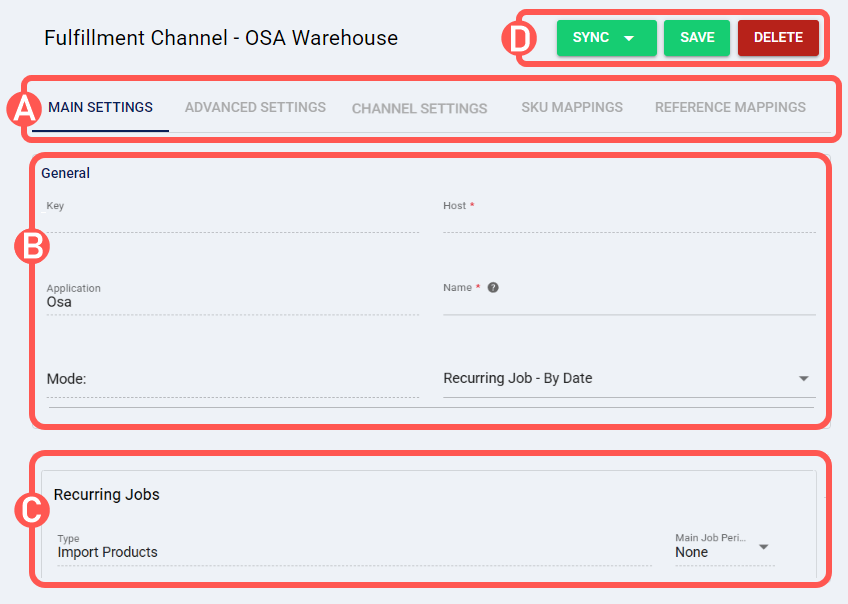
SECTIONS
A) VIEW SELECTION allows changing the different view modes:
- Main Settings (default): Allows reviewing and setting the basic connection settings.
- Advanced Settings: Allows to define channel Advanced settings as detailed in How to manage Fulfillment Channels Advanced settings [Step-by-Step guide]. In addition to those settings, the following options are specific to OSA fulfillment channels:
- Purchase Order Type: Allows to specify all the purchase order types (e.g.: Inbound, Return, etc.) that this fulfillment channel will process. techOMS will map this field to the OSA's ASNType field.
 NOTE: To handle multiple purchase order types (e.g., Inbound and Return), you have the following options:
1. Create one OSA fulfillment channel per purchase order (ASN) type.
2. If your sales orders provide the purchase order type information in a reference field (for example, ASNType in a specific Integrated Flow set up), you can leave the Purchase Order Type field blank and use the Reference Mappings tab to map this code to the OSA's ASNType field. Refer to How to map References in a Fulfillment Channel [Step-by-step guide] for more details.
Choose the method that best aligns with your operational workflow. - From address... (Sender information): This section allows you to enter the sender's details for all incoming stock specified in the purchase orders. The following fields are available: From address name, From address company, From address, From address city, From address zip code, From address country, From address state, From address phone, and From address email.
- Purchase Order Type: Allows to specify all the purchase order types (e.g.: Inbound, Return, etc.) that this fulfillment channel will process. techOMS will map this field to the OSA's ASNType field.
- Carrier Mappings: Allows reviewing and setting Carrier name mappings between the WMS connection and techOMS as detailed here: How to map Carriers in a Fulfillment Channel [Step-by-step guide].
- SKU Mappings: Allows reviewing and setting SKU mappings between the WMS connection and techOMS as detailed here: How to map SKUs in a Fulfillment Channel [Step-by-step guide].
Reference Mappings: Allows reviewing and setting reference mappings between techOMS and OSA. Fields are mapped only from techOMS to OSA. For custom fields, the following logic applies to sales orders:
1. techOMS checks the Reference Mappings tab for static field mappings.
2. If no mapping is found for an order- or line-level reference, techOMS queries OSA to check whether a custom field exists with the same name as the techOMS reference code. If a match is found, the value is mapped to that field; otherwise, it is ignored.
Refer to How to map References in a Fulfillment Channel [Step-by-step guide] for more details.- Integrations: Allows configuring connections to the external systems interacting with the channel (WMS, techSHIP, etc.):
- Domain: Domain obtained from the warehouse URL (e.g., XXXXXXXX-XXXX-XXXX-XXXX-XXXXXXXXXXXX).
- API Token: API Token used to connect to OSA. You can get this token by setting up an api-key and secret in OSA, and encoding both in base 64 using the format api-key:secret.
- Vendor External Id: Vendor identifier within OSA. It links a specific supplier between techOMS and OSA. Contact your OSA representative to get its value.
- Channel External Id: Channel ID within OSA. It helps associate orders with the correct source. Contact your OSA representative to get its value.

B) GENERAL displays and/or allows editing the connection name.
- Key: API key for the channel.
- Host: techOMS' OSA Fulfillment Channel plugin URL.
- Application: Connection type.
- Name: Connection name. You can edit it for more convenient identification within techOMS.
- Mode: Defines how techOMS receives data from OSA.
• Recurring Job: Data is retrieved periodically.
– By Date: Uses date filters to retrieve records.
– By ID: Uses incremental identifiers to retrieve records.
• Webhook: OSA sends data to techOMS in real time via HTTP callbacks.
WARNING: When operating in Webhook mode, the webhook must be configured on the OSA side by tech support. Requests must include the header X-OSA-Signature.
The general callback URL format is:
https://techoms.io/api/v2/fulfillmentchannels/webhook/channelKey/entityId
C) This section includes Recurring jobs where it displays information about the synchronization actions and last activity, and the Inventory Synchronization Mode options.
D) QUICK ACTIONS allows to perform additional/quick actions:
- Health Check: Verifies if the connection is active or not.
- Save: Saves and commits changes.
- Delete: Deletes the channel connection.
NOTE: If you wish to set up automations for the channel, follow the steps here: How to configure Recurring Jobs for Sales/Fulfillment channel Automation [Step-by-step guide].Was this article helpful?
That’s Great!
Thank you for your feedback
Sorry! We couldn't be helpful
Thank you for your feedback
Feedback sent
We appreciate your effort and will try to fix the article