When setting up a Fulfillment Channel connection, you can manage Advanced Settings. These can be added to already created Fulfillment Channels and will differ depending on the Fulfillment Channel type and version.
This article is divided in the following sections:
- Access the Advanced Settings
- Stable Fulfillment Channel Advanced Settings
- Beta Fulfillment Channel Advanced Settings
- Apply Changes
To check if your Fulfillment Channel is stable or beta, refer to techOMS Fulfillment Channels - Master List [Guides List].
 NOTE: Make sure that you are operating at the right Account beforehand.
 WARNING: Although this article is divided by channel version (stable or beta), slight differences in available options may still exist depending on the channel type. Consult the techOMS Fulfillment Channels - Master List [Guides List] for those settings specific to your integration.
I. ACCESS THE ADVANCED SETTINGS
To access the advanced settings:
1. Click Channels from the left menu under the Fulfillment Channels section.
2. Click on the Name of the desired fulfillment channel.

3. Click the Advanced Settings tab.

II. STABLE FULFILLMENT CHANNEL ADVANCED SETTINGS
The available advanced settings for stable fulfillment channels are:

B.1) Channel Settings
- Credentials (Webhook/API keys/tokens): Allows updating connection credentials.
- Backorder Mode: Define whether backorders will be managed in techOMS or the Fulfillment Channel, as detailed in Understanding Backorders in techOMS [Information].
- Suppress PII: If checked, suppresses passing Personally Identifiable Information.
- Reference Number Templates: Edit to name the template and choose the related field.
- Extension Digit and GS1 Company Prefix: Set the Extension Digit and GS1 Company Prefix associated with the vendor. This information helps reconstruct the full label within techOMS when needed.
B.2) Timezone shows the fulfillment channel timezone.
B.3) Unit of Measure (UOM)
Size: Switch to define the UOM type for dimensions.
Weight: Switch to define the UOM type for weight.
NOTE: To learn more about UOM, refer to How Units of Measurement work in techOMS [Information]. B.4) API Validation Rules
Sales Order: Switch to define the Status type (Warning or Error) for Carrier and Service Code.
Shipment: Switch to define the Status type (Warning or Error) for Carrier and Service Code.
Purchase Order: Switch to define the Status type (Warning or Error) for Carrier and Service Code.
Receipt: Switch to define the Status type (Warning or Error) for Carrier and Service Code.
III. BETA FULFILLMENT CHANNEL ADVANCED SETTINGS
The available advanced settings for beta fulfillment channels are:
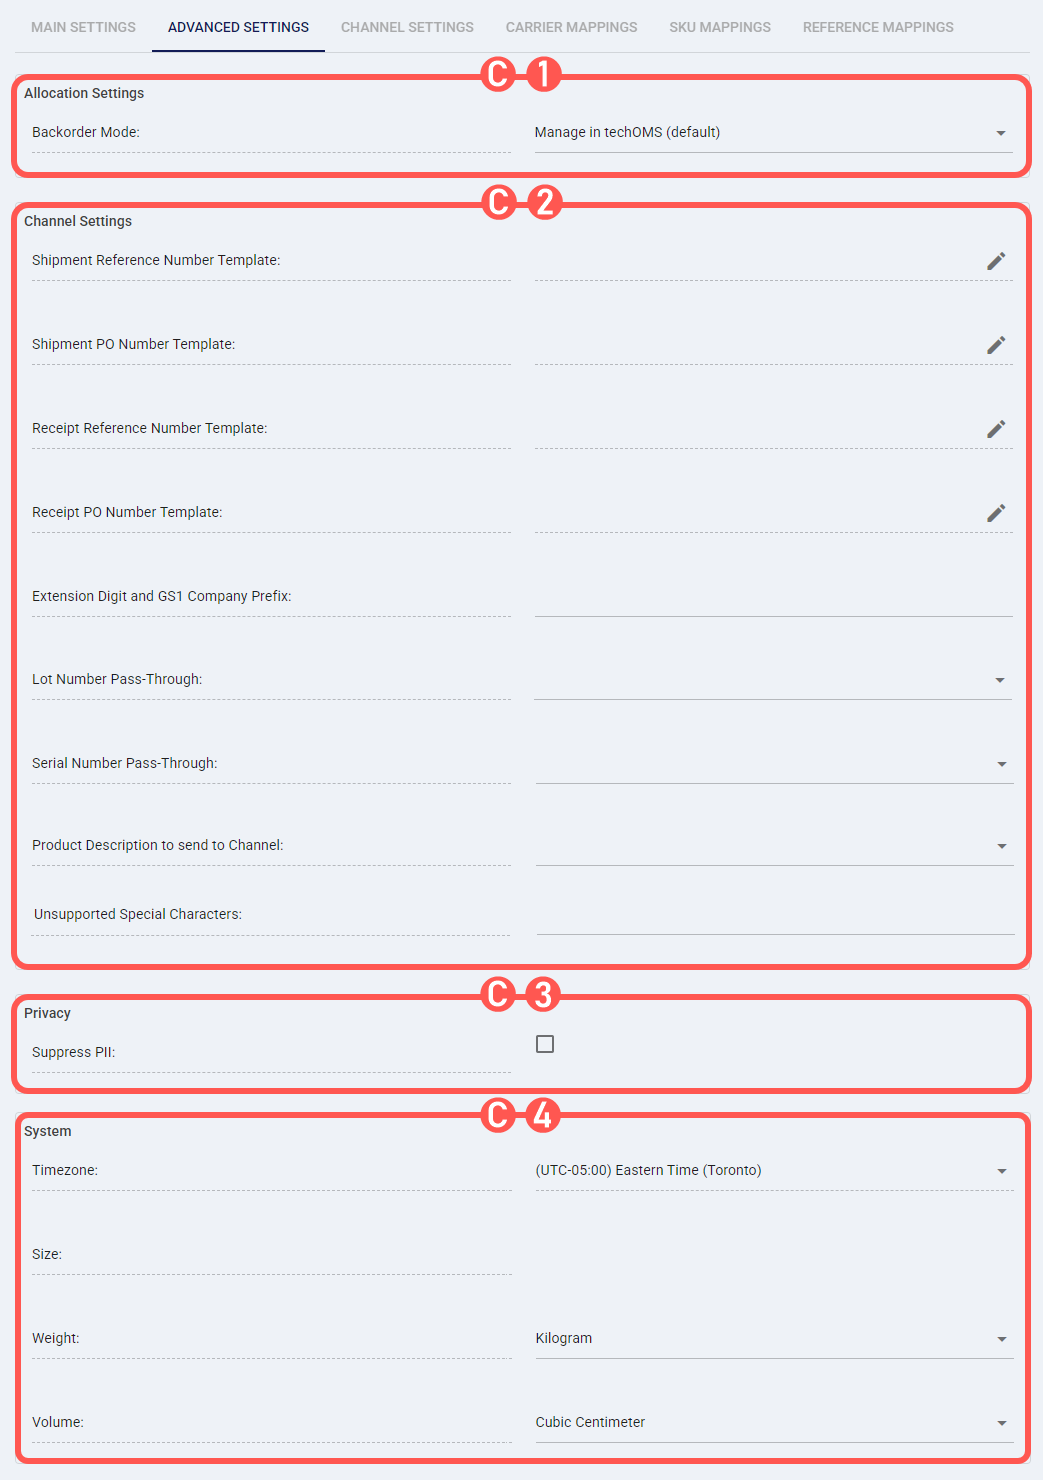
C.1) Allocation Settings
- Backorder Mode: Define whether backorders will be managed in techOMS or the Fulfillment Channel, as detailed in Understanding Backorders in techOMS [Information].
C.2) Channel Settings
- Reference Number Templates: Edit to name the template and choose the related field.
- Extension Digit and GS1 Company Prefix: Set the Extension Digit and GS1 Company Prefix associated with the vendor. This information helps reconstruct the full label within techOMS when needed.
- Lot/Serial Number Pass-Through: When enabled, lot and serial numbers are received from the channel as detailed in Understanding Lot and Serial Numbers Synchronization [Information].
- Product Description to send to Channel: Defines how product information is sent from techOMS to the channel's product description field:
- Product Variant Name: Sends only the product variant name.
- Product Name + Product Variant Name: Sends the product name followed by the variant name, separated by a hyphen (e.g., Cotton T-shirt - L).
 NOTE: This format is recommended when a full product-variant name is needed for warehouse tasks such as picking and packing.
- Unsupported Special Characters: Enter specific characters that must be stripped from data before it is sent to the fulfillment channel. Type the character and press Enter to add it as a tag. You can add multiple characters.
NOTE: Spaces, empty tags, invisible characters, Unicode characters, and emojis are not supported as valid inputs for this field.
C.3) Privacy
- Suppress PII: If checked, suppresses passing Personally Identifiable Information.
C.4) System
Timezone: Shows the fulfillment channel timezone.
Size: Switch to define the unit of measure type for dimensions.
Weight: Switch to define the unit of measure type for weight.
Volume: Switch to define the unit of measure type for volume.
NOTE: To learn more about UOM, refer to How Units of Measurement work in techOMS [Information].
IV. APPLY CHANGES
After modifying the desired settings, click Save to apply the changes.

Was this article helpful?
That’s Great!
Thank you for your feedback
Sorry! We couldn't be helpful
Thank you for your feedback
Feedback sent
We appreciate your effort and will try to fix the article